How does Borrowing workflow work? (New Requests)
Getting oriented to the Borrowing workflow in Clio
Where does a Borrowing Request Start?
The Borrowing workflow of course starts with your patrons. When they decide they want to request an item they go to the Clio patron application and submit the request. They can open the request form themselves and enter all the bibliographic details. You can also turn on OpenURL links or buttons in your discovery service or other databases where your patrons do their searching so that when they click 'Request from ILL' they are directed to Clio's request form and the bibliographic details are already in the form. See more about the OpenURL process here.
You can also create a request manually in the staff application from the 'Create New Request' button on the New request screen in Clio (see next section). We wouldn't recommend this as an everyday routine - it's more work for your patrons and for you, and introduces more opportunity for errors and delays.
You can also create a request manually in the staff application from the 'Create New Request' button on the New request screen in Clio (see next section). We wouldn't recommend this as an everyday routine - it's more work for your patrons and for you, and introduces more opportunity for errors and delays.
New requests in Clio
Once new requests have been created you should review them in Clio. Select the New category from the left-hand request filter in Clio to see them in a grid view.
As with all the grid views in Clio you can decide how they work - which columns are helpful for you - and which sort order would you like to use by default? You can set your choices in the Table Columns preference item.
For now, we'll select one of the requests to open it and see what happens next.
As with all the grid views in Clio you can decide how they work - which columns are helpful for you - and which sort order would you like to use by default? You can set your choices in the Table Columns preference item.
For now, we'll select one of the requests to open it and see what happens next.
A single request
When you have a request open, Clio shows you the information about the request, and gives you the tools to take the next step, whatever that may be. We'll look at a few of them here.
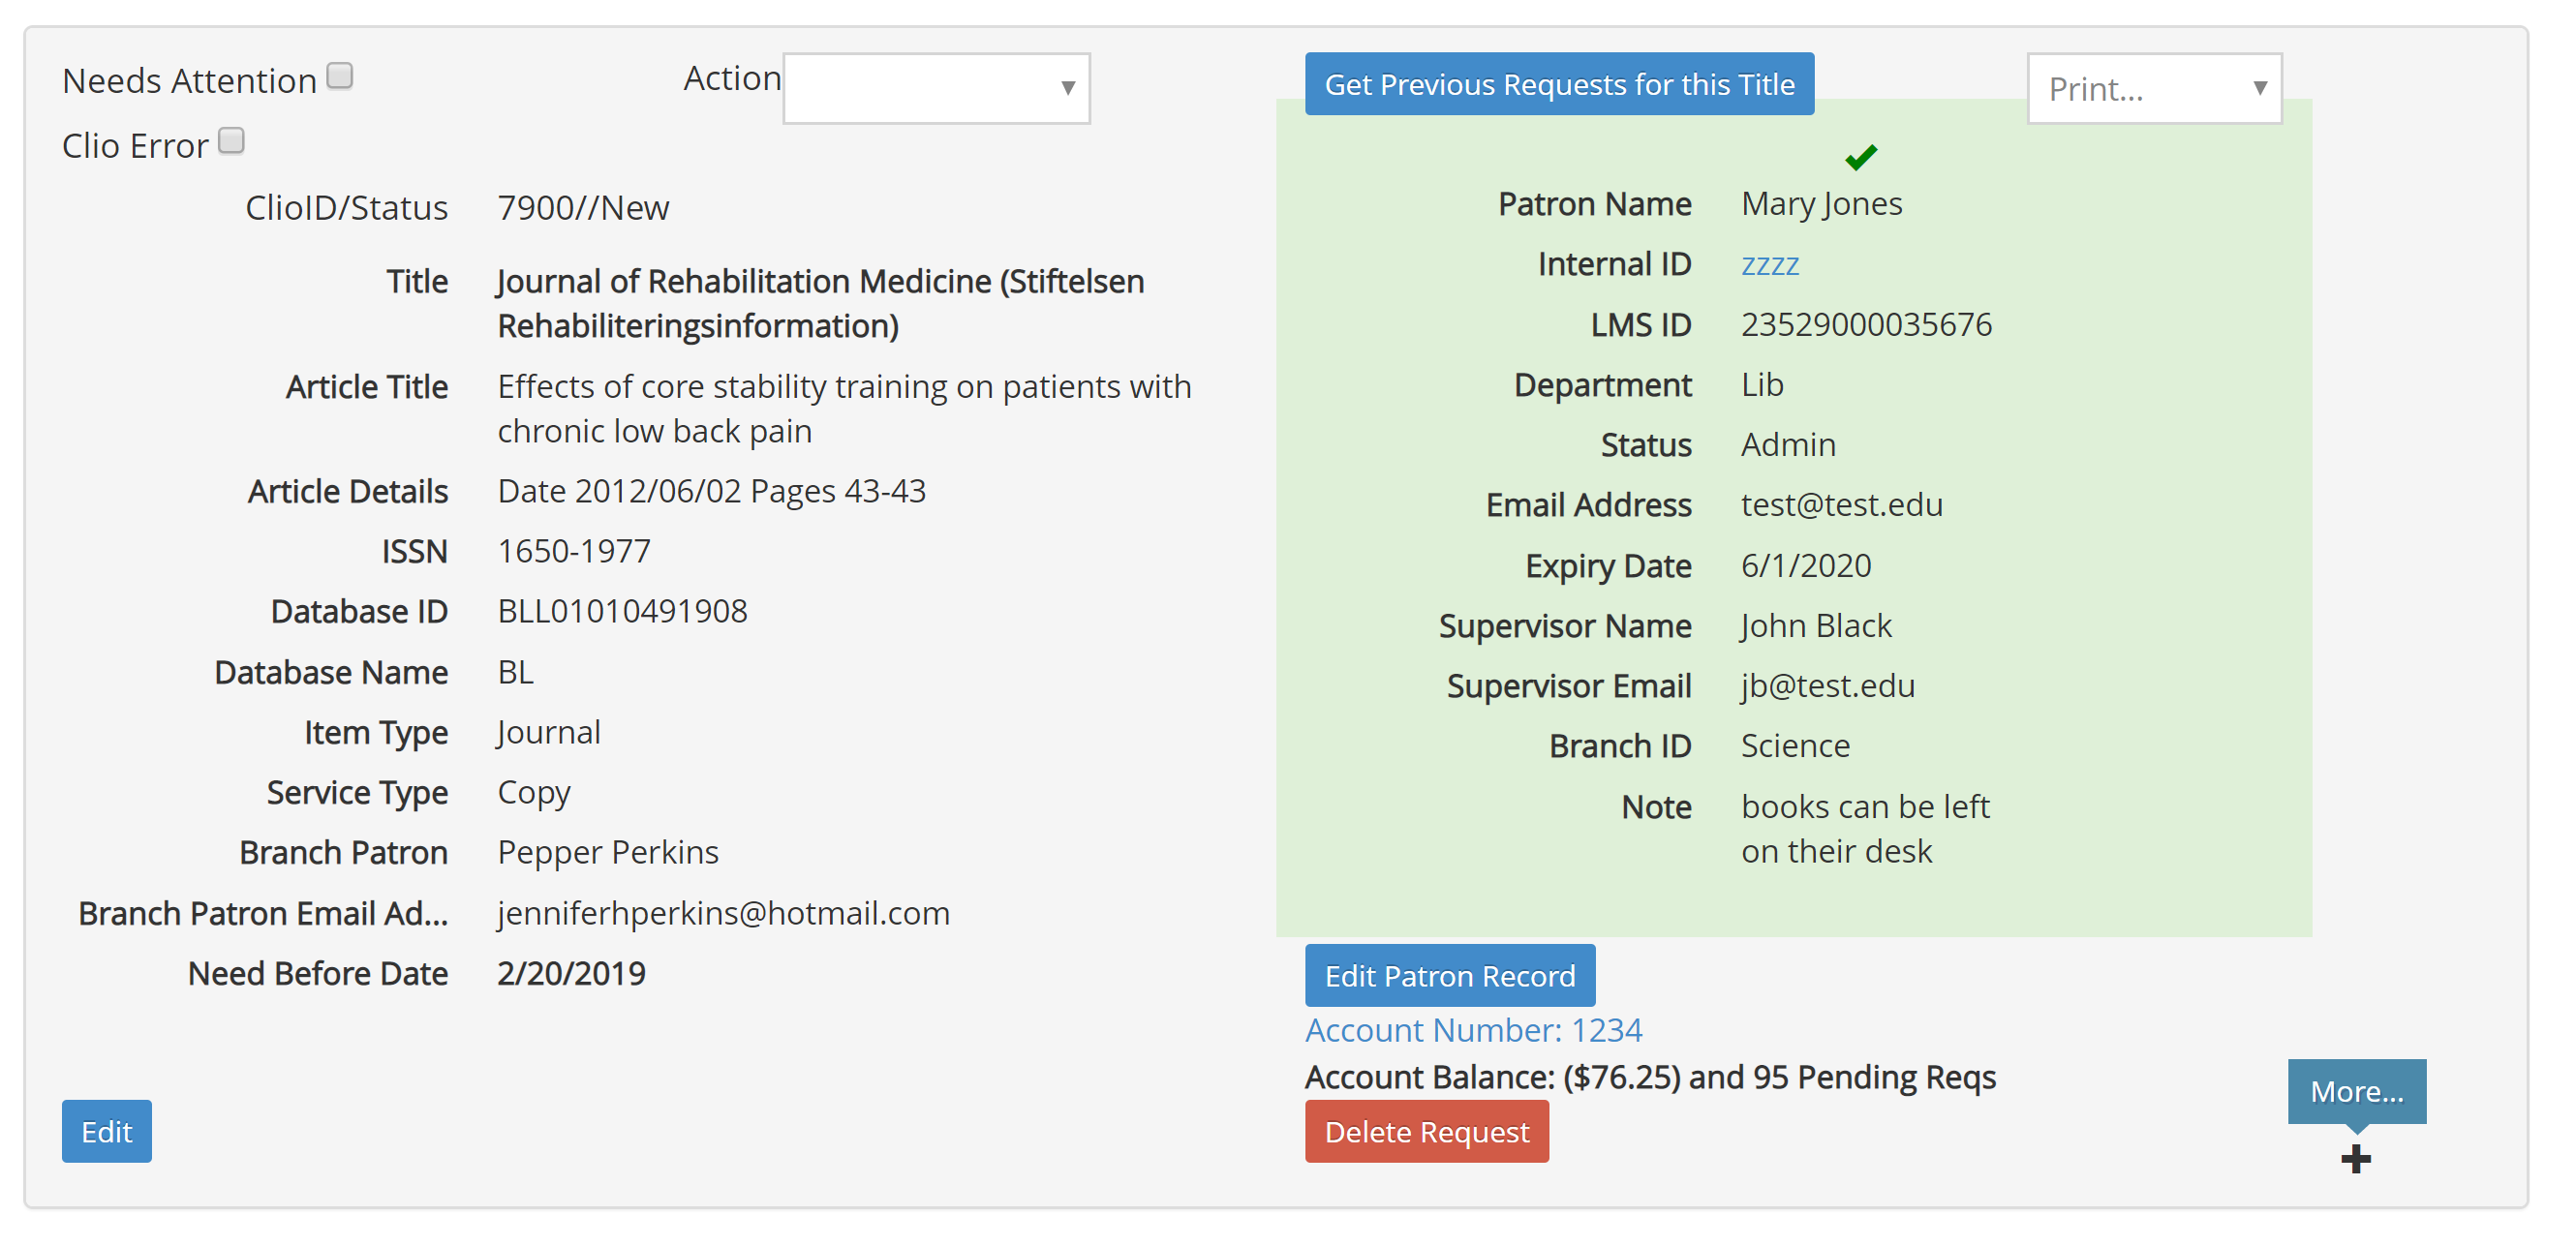
The top panel shows you the important details from the request and from the patron's record. If you click this panel it expands to show you more information, including important dates. A request in the New category doesn't have too much information here yet - it will get filled in further as the request goes through its life.
The patron information indicates whether the patron has been approved by you (green check mark if approved and red X if not). This gives you an opportunity to review the information provided by a patron who is new to Clio, verify status and name, check your other systems to see if there's any problem with accepting their requests. When you've decided to approve the patron (or make any other changes) you can edit the patron record from this display.
The Action dropdown control allows you to leave a little more information about the request at the top of the page and in the grid view. The values in this list are chosen by you - they often include staff members' names (to indicate who is working on a request or who should review it) and actions taken (asking patron for more citation information or asking for budget approval, for example).
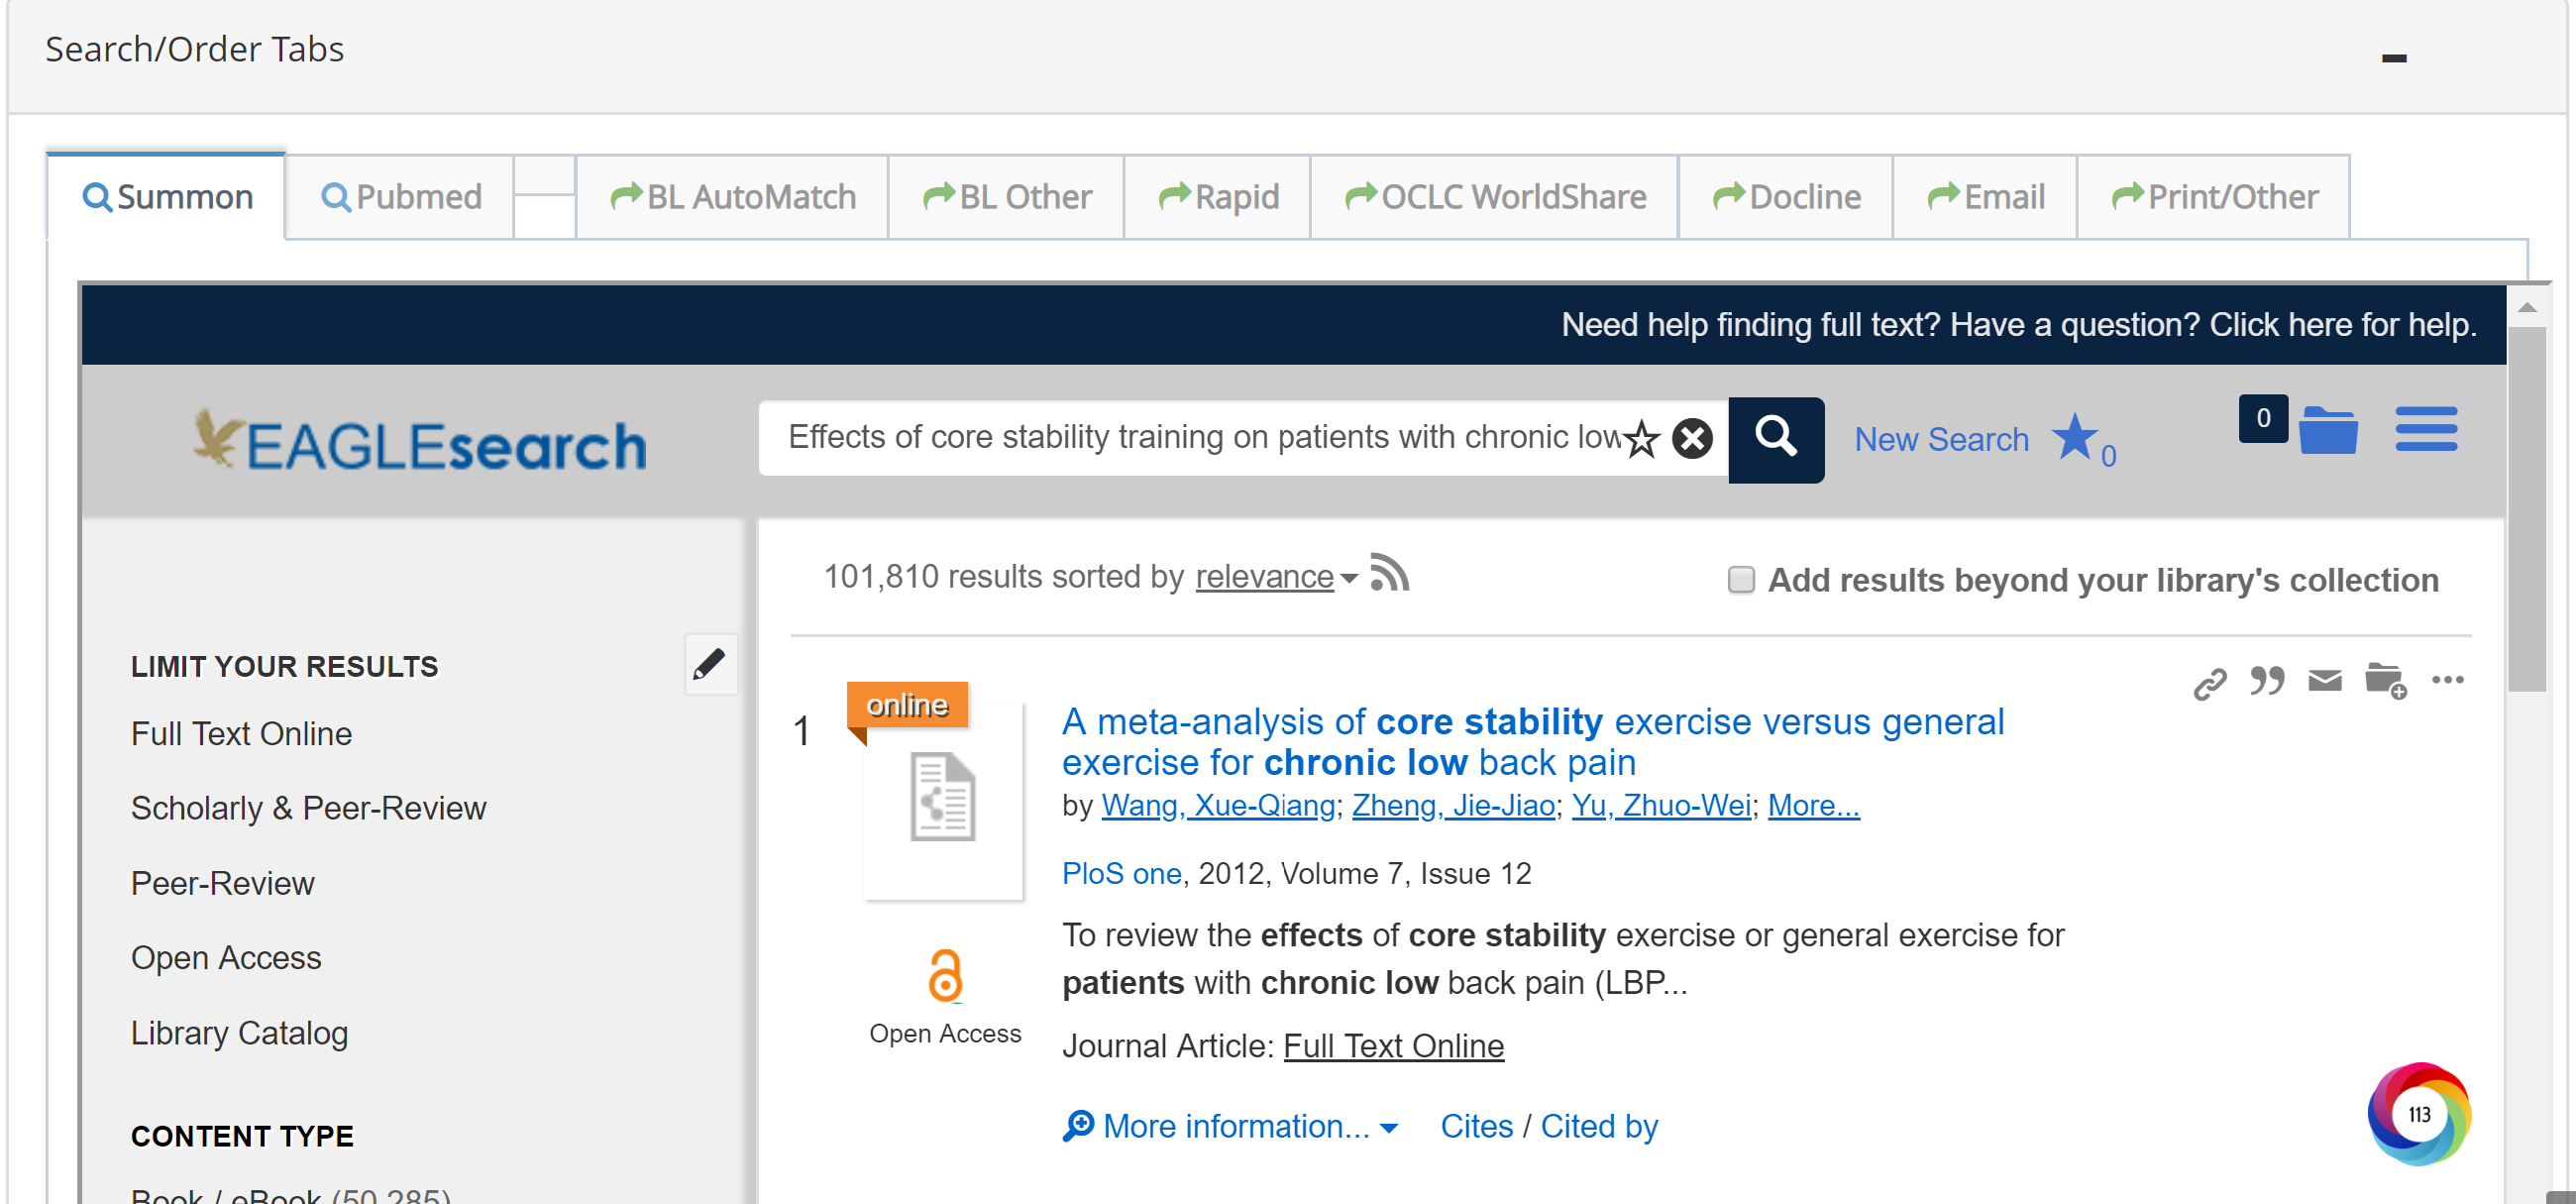
The next panel down shows Clio's Search and Order tabs. The Search Tabs are where Clio performs searches of the websites you've chosen. This is often your own discovery service along with other sites that help you decide where the item should be sent, or help provide you with IDs, such as an OCLC number or PubMed ID. You can also include Google (a special Chrome browser extension is required for this - contact Clio support). The Order tabs are where you can send a request to a potential lender. The options you'll see here will depend on which external systems you use (OCLC, BL, Rapid, Docline). Once a request has been sent to a potential lender (or external system) the request will move to the Pending status.
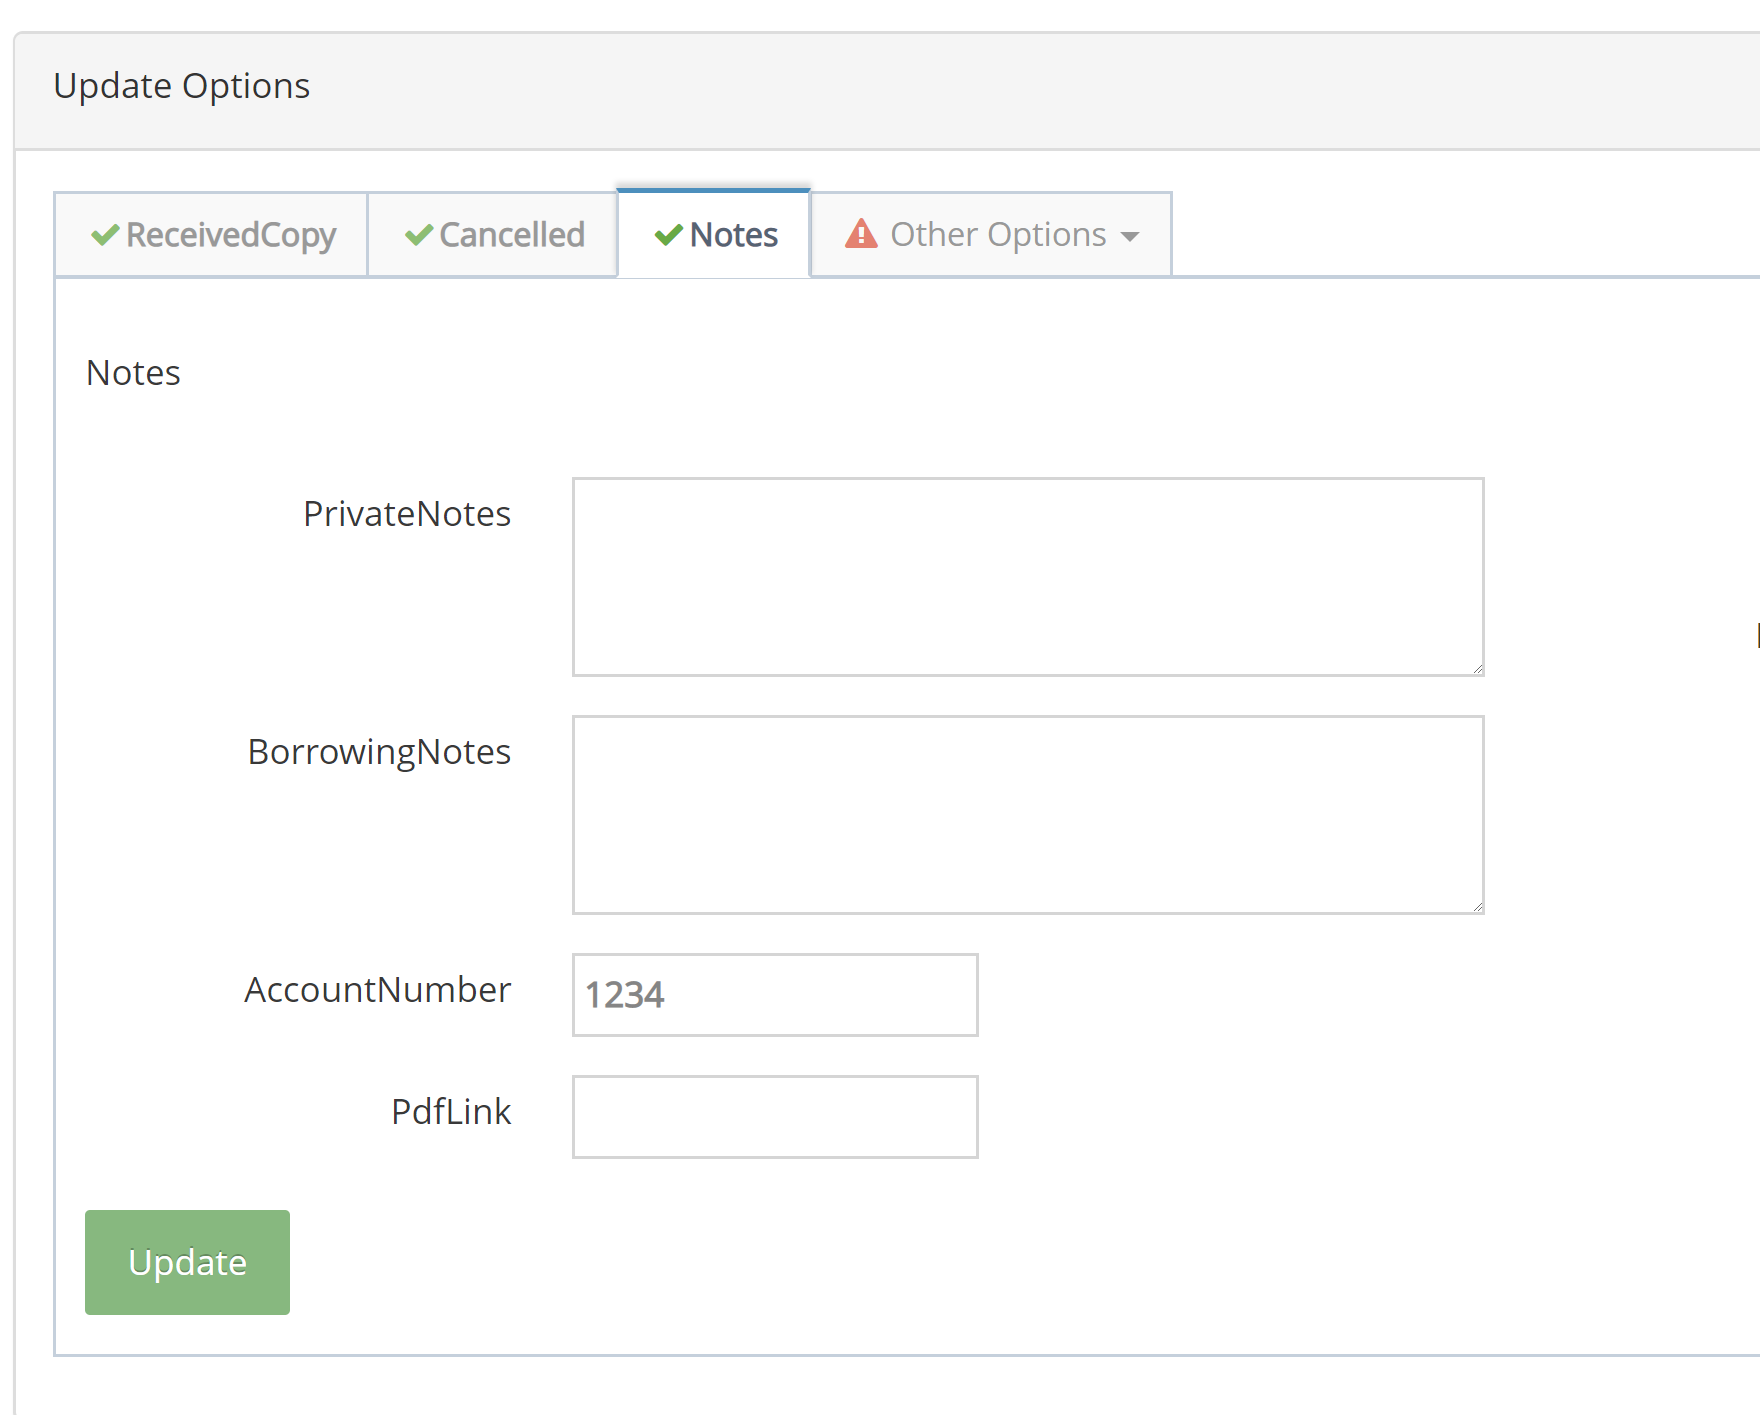
The next panel is the Update Options panel. You can use this panel to Cancel an item or use the Notes option to edit some of the most common fields in the request. You can always edit a request directly, but since a Clio request has a large number of fields and there are a handful which are frequently changed we provide a simpler update option for these fields (mostly notes and ID fields).
For more information about updating requests see here
For more information about updating requests see here
The next panel is the Email Options panel. From here you can send emails, including bits of the request and patron information in the message. You can create as many email message templates as you like. For a New request this is often an email to the patron to ask a follow-up question about the request. If the patron's record contains a supervisor (often an academic advisor or department budget contact) you can send email to them as well (if this is an every-time task you can automate this sort of email in the patron application). If the request has been created on behalf of someone else, and their email address is in the BranchPatronAdd field, you can send email to them as well (again if this is done every time you can automate the process in the patron application). You can also used the local-list option to send emails to specific addresses not connected to this particular request (often an internal collection development person or someone in charge of budget issues).
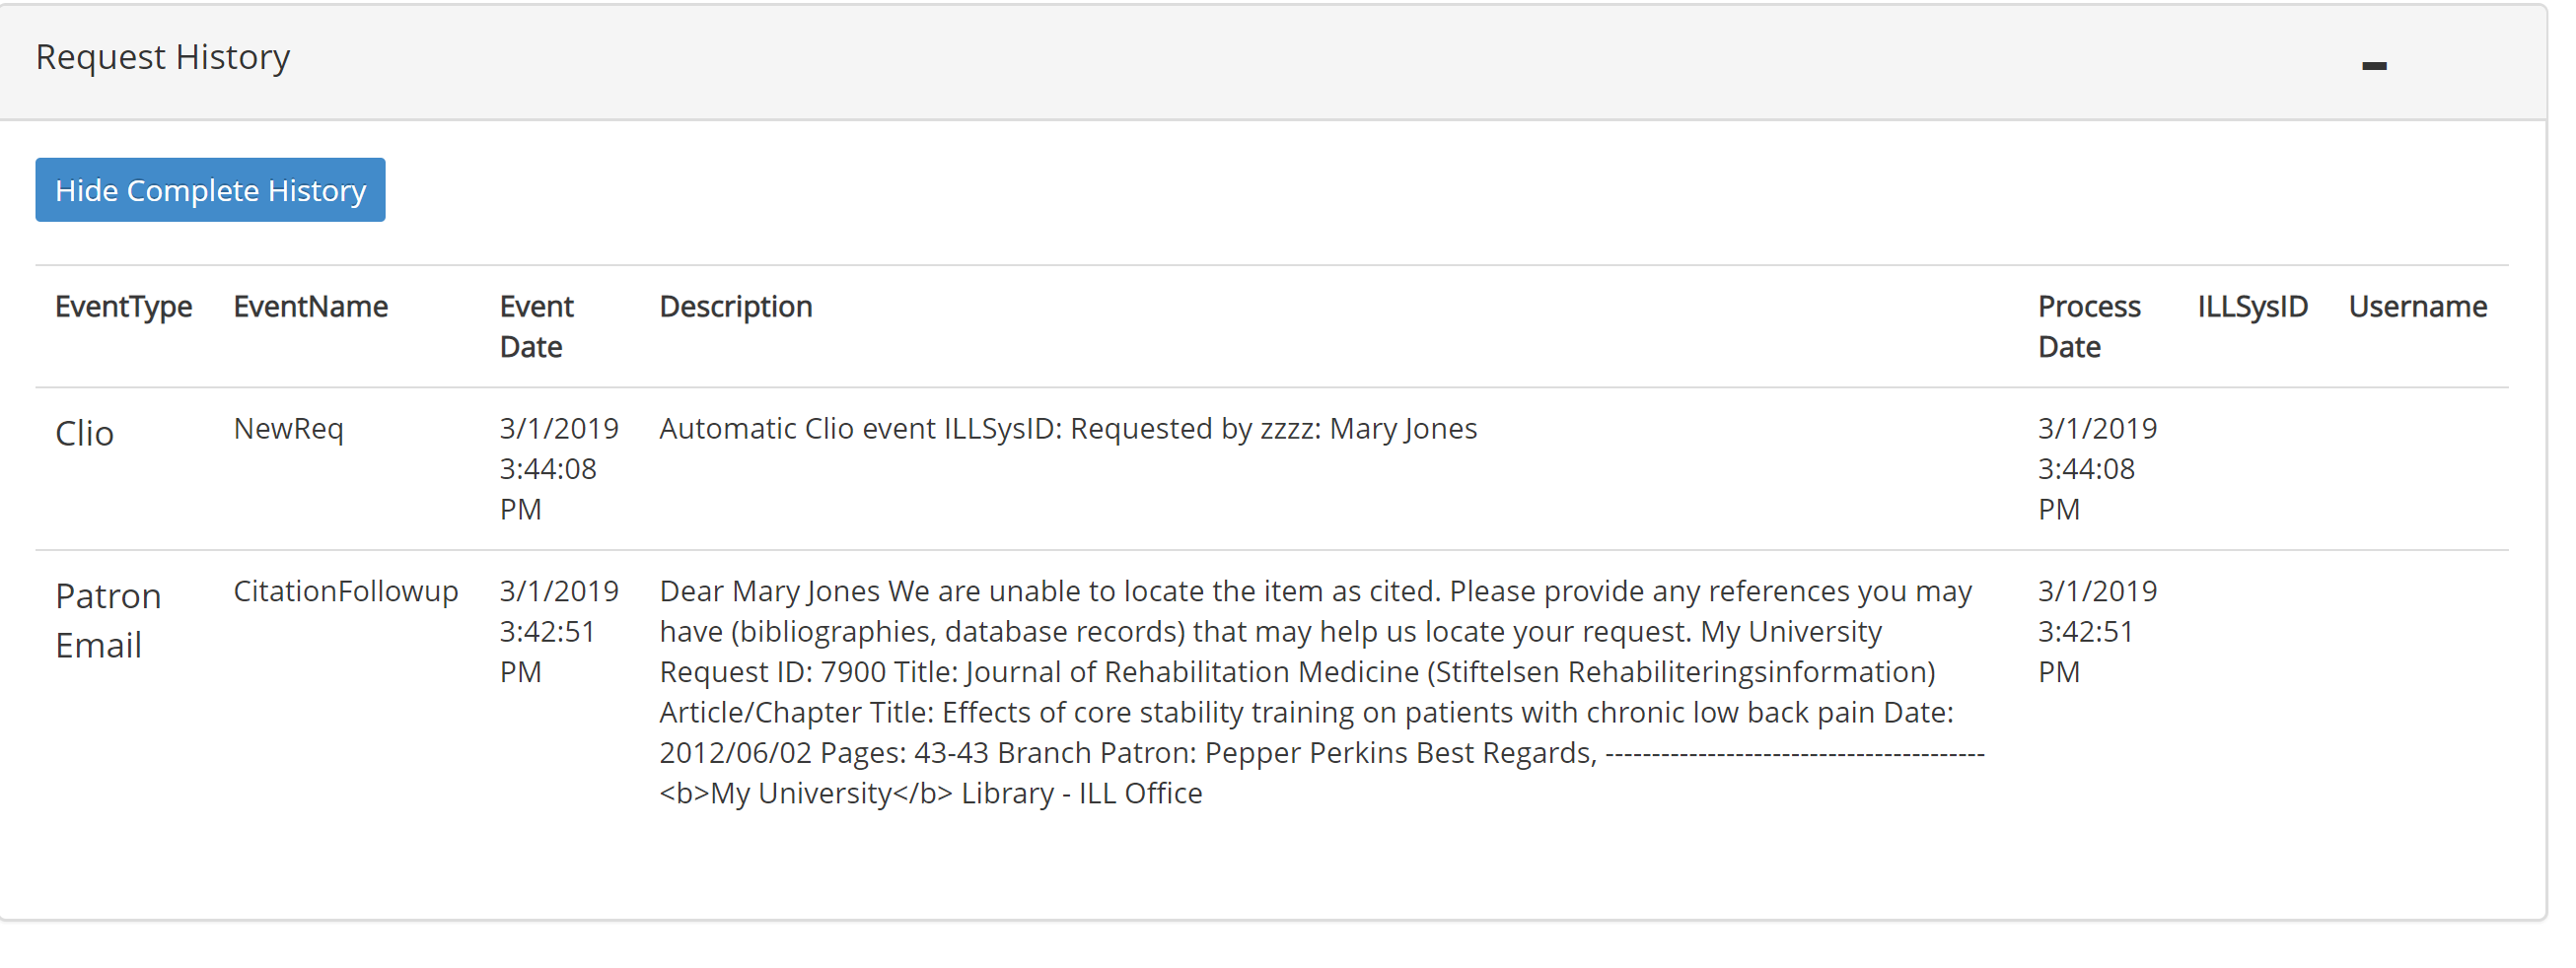
The final panel is the Request History panel. When first displayed Clio shows the big lifetime events, mostly those which involve a status change. If you click Complete History you can see all the details. For New requests this is usually just email messages, since Clio hasn't had any communication with external systems yet.
A typical workflow
For a routine request, you might open the request, check the bibliographic details, any Patron Notes, and the patron information to ensure there aren't any obvious obstacles. Then use the Search tabs to determine whether or not you have access to the item, and copy any useful ID numbers. Finally, use one of the Order tabs to send the request to a potential lender, adding an ID number if necessary.
Docline requests and OCLC/WorldShare Review/Save requests will then need to be completed in Docline or WorldShare.
Docline requests and OCLC/WorldShare Review/Save requests will then need to be completed in Docline or WorldShare.
A more complicated example
If a patron has requested a large number of items and you need to get approval from the budget office you could send an email to the patron, asking for some more information about why they're requesting so many items (are they working on a dissertation?) and mark the request Action drop down with the value CheckWPatron (so that later in the day you don't have to open the request to remember its situation).
When you receive the response you could use the Notes update option to add any relevant information to the request and then use the local-list email option to send to the person in charge of budget approvals in the library, including information about the request and patron and then adding any special circumstances to the message and mark the request with an Action of BudgetCheck.
When the response comes you might be given approval to process the request as usual (using the Order tabs to send the request to potential lenders) or you might be told that since the journal is in demand the library has purchased a license for electronic access. In that case you could cancel the request (with a reason of 'Purchase') and send a final email to the Patron providing them with the link to the newly-accessible material.
The idea is to use the Emails, Updates, Search/Order tabs and Actions to take whatever steps you need to take. The full activity will be displayed in the Request History panel but the Action drop-down allows you to leave some breadcrumbs in an obvious spot to help you know what's happening with an atypical request along the way.
More Instructions
For more information about sending requests to a specific supplier, see:
OCLC
Docline
Rapid
British Library
Other Libraries and Self-Fill
OCLC
Docline
Rapid
British Library
Other Libraries and Self-Fill